Homemade Milk and Herb Cheese Spread
If you’ve ever wanted to make a simple, fresh cheese spread from scratch, this homemade milk and herb cheese spread is just the recipe you need. It’s incredibly straightforward but yields a delightfully creamy and tangy spread that’s perfect for everything from toast and crackers to sandwiches. The process uses just a few everyday ingredients and relies on the natural curdling of whole milk with lemon juice — no special cheese culture or complex aging required. Since the cheese is drained just long enough to hold its shape but remain soft, it’s packed with fresh flavor and a lovely silky texture.
Adding fresh herbs like dill or parsley gives it a bright, garden-fresh note, while the olive oil rounds out the richness. Black pepper adds just a little bit of warmth without overpowering the subtle flavors. One trick that works well is gently simmering the milk instead of boiling it to avoid a burnt flavor and stirring in the lemon juice slowly — this helps the curds separate cleanly for a smoother spread.
Why You’ll Love This Recipe
- Uses simple, everyday ingredients you probably already have on hand
- Fresh and light, yet creamy enough to replace store-bought spreads
- No complicated cheese-making skills or special equipment needed
- Quick to make — about 20 minutes of hands-on time plus draining
- Easily customizable with your choice of fresh herbs and seasoning
- Perfect for adding a homemade touch to snacks, appetizers, and meals
Ingredients
- 4 cups (960 ml) whole milk
- 3 tablespoons (45 ml) fresh lemon juice
- 1/2 teaspoon (3 g) salt
- 1 tablespoon (3 g) chopped fresh dill or parsley
- 1 tablespoon (15 ml) extra-virgin olive oil
- Black pepper to taste
Ingredient Notes
Whole milk is key here for a rich, creamy cheese; low-fat milk won’t curdle quite the same way or yield as creamy a texture. Fresh lemon juice works better than bottled because it more reliably causes curdling without adding off flavors. Fresh herbs like dill or parsley add brightness — choose whichever you prefer or mix them for more complexity. Olive oil adds silky richness and helps the cheese spread smoothly. Using good-quality extra-virgin olive oil makes a noticeable difference.
Kitchen Tools Needed
- Medium saucepan
- Wooden spoon or silicone spatula
- Fine-mesh strainer or colander
- Cheesecloth or clean kitchen towel
- Mixing bowl
Step-by-Step Instructions
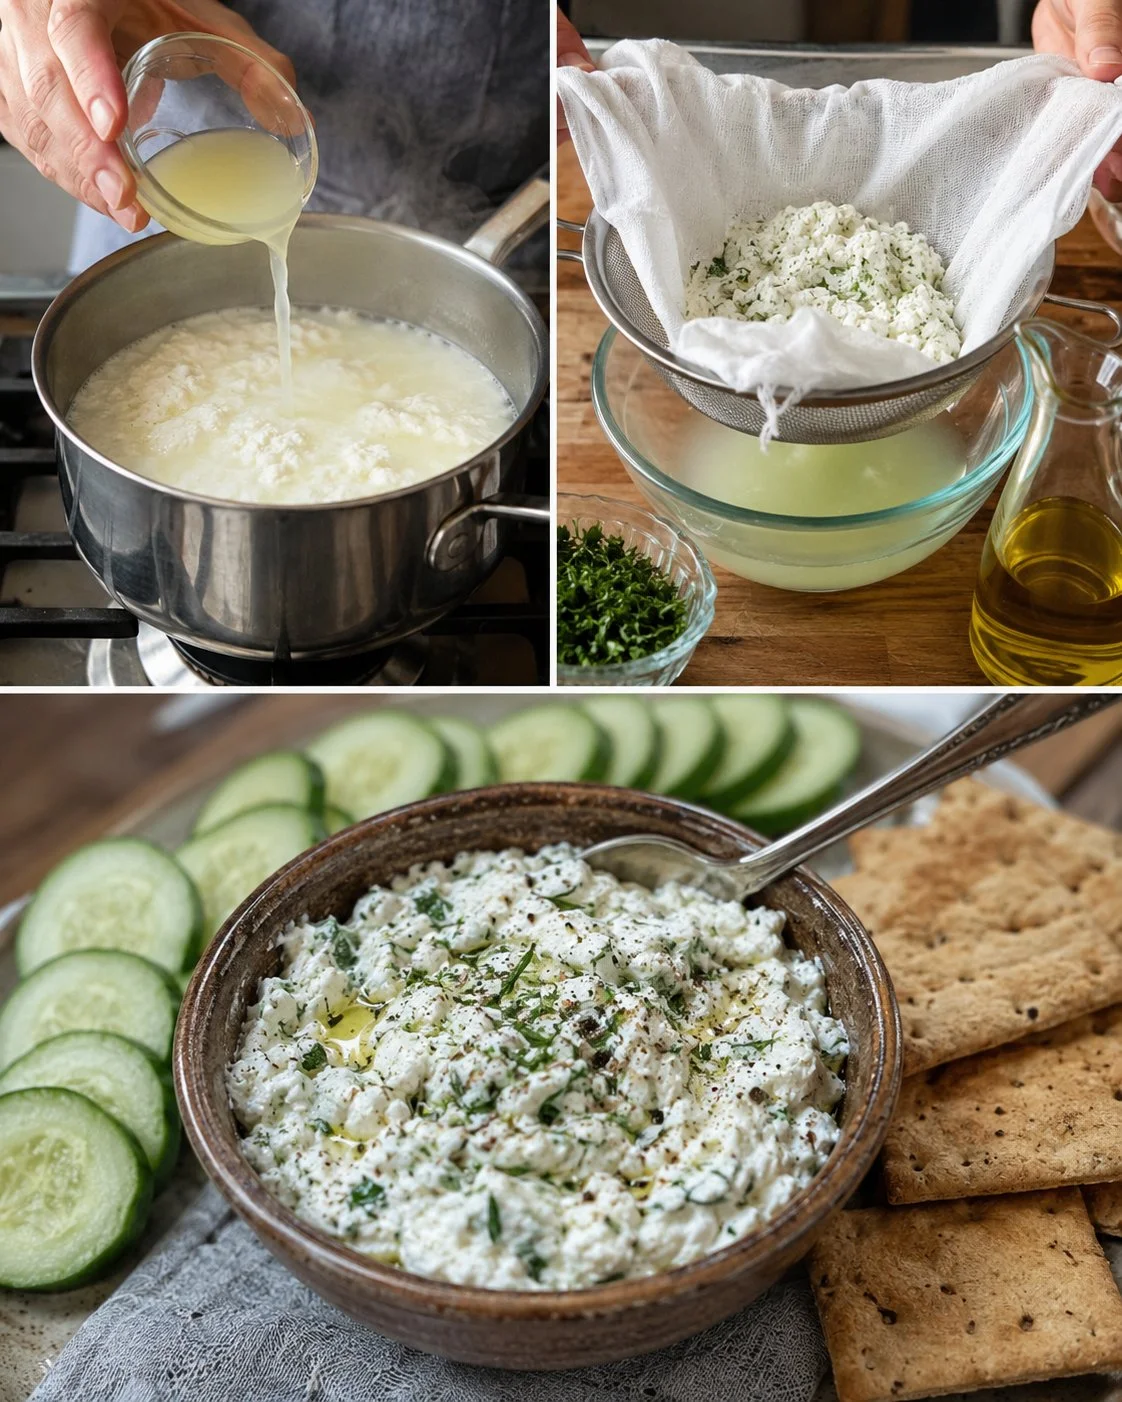
- Pour the whole milk into a medium saucepan and place it over medium heat. Warm the milk gently, stirring occasionally, until it just begins to simmer (small bubbles form around the edges), about 8 to 10 minutes. Avoid letting it boil, which can alter the flavor.
- Remove the saucepan from heat and slowly stir in the lemon juice. Return to very low heat and gently stir for 1–2 minutes until you see the curds (solid white clumps) separate from the translucent yellowish whey. Curds should look firm but still tender.
- Line a fine-mesh strainer or colander with a double layer of cheesecloth or a clean kitchen towel and set it over a bowl to catch the whey. Carefully pour the curds and whey into the strainer. Let it drain for about 20 minutes. For firmer cheese, you can let it drain a bit longer, but be careful not to dry it out.
- Transfer the drained curds to a mixing bowl. Add the salt, chopped fresh dill (or parsley), olive oil, and a few grinds of black pepper. Stir gently but thoroughly to combine all ingredients into a creamy spread.
- Taste and adjust seasoning if needed. Transfer the cheese spread to an airtight container and chill in the fridge for at least 1 hour before serving. This helps the flavors meld and the texture firm up slightly without losing softness.
Pro Tips
- Use fresh, high-quality whole milk — avoid ultra-pasteurized as it can affect curdling.
- Stir gently after adding lemon juice to avoid breaking curds into grainy bits.
- If the curds don’t form well, add a little more lemon juice a teaspoon at a time and stir gently.
- Let the cheese drain well but don’t rush the draining — proper moisture balance is key to creamy texture.
- For a smoother spread, you can pulse the cheese gently in a food processor with olive oil before chilling.
Common Mistakes
- Heating the milk too quickly or letting it boil, which can cause bitter or burnt flavors.
- Using insufficient lemon juice; underacidifying will prevent proper curdling.
- Disturbing the curds too much while separating, which breaks them into grainy fragments.
- Draining for too little time, resulting in a wet, loose texture, or draining too long and ending up with a dry cheese.
- Skipping the chilling step — the cheese tastes best with a little rest in the fridge.
Variations
- Swap dill or parsley for chives, basil, or tarragon for a different herbal note.
- Stir in finely chopped sun-dried tomatoes or roasted garlic before chilling for extra flavor.
- Add a pinch of smoked paprika or cumin for a gentle smoky twist.
- Mix in honey or a touch of maple syrup for a slightly sweet spread variation.
Serving Suggestions
Serve this soft cheese spread chilled on warm crusty bread, crackers, or bagels. It also works well dolloped on baked potatoes or as a tangy topping for grilled vegetables. Try it as a base layer in a sandwich with fresh tomatoes and cucumbers for a fresh lunch. The gentle herb aroma makes it a wonderful addition to a charcuterie or appetizer platter.
Storage Instructions
Keep any leftover cheese spread in an airtight container in the refrigerator for up to 4 days. The flavor will deepen slightly over time. Avoid storing near strong-smelling foods to maintain the fresh herb flavors.
Reheating Tips
This cheese spread is best served cold or at room temperature. Reheating isn’t recommended as it can affect the creamy texture and fresh flavor.
Nutrition Estimate (per 2-tablespoon / 30 g serving)
- Calories: 90
- Protein: 5 g
- Carbohydrates: 1 g
- Fat: 7 g
Recipe Summary
- Prep Time: 15 minutes
- Cook Time: 10 minutes
- Total Time: 35 minutes (including draining)
- Servings: About 12
- Cuisine: Homemade dairy / fresh cheese
- Course: Spread / Appetizer
- Calories: 90 per serving
Frequently Asked Questions
Can I use low-fat or skim milk for this recipe?
Low-fat or skim milk won’t curdle as well due to the lower fat content and will create a watery texture. Whole milk gives the best creamy, rich result.
What if my curds don’t form after adding lemon juice?
Add lemon juice a little at a time and stir gently. If it still doesn’t separate, your milk might be too fresh or ultra-pasteurized — try a different brand or batch.
How long can I store this cheese spread?
It keeps well for up to 4 days refrigerated in a sealed container. Fresh herbs might lose aroma after a couple of days but the overall flavor stays good.
Can I substitute vinegar for lemon juice?
Yes, white or apple cider vinegar works, but lemon juice usually gives a cleaner, fresher flavor.
Can I make this without fresh herbs?
Absolutely. It’s tasty plain too, with just salt, olive oil, and pepper. Fresh herbs add brightness but aren’t essential.
Making this simple homemade cheese spread is a great way to bring freshness and a creamy texture to your snacks without any fuss. It’s versatile and forgiving, so once you get the hang of the gentle heating and draining, it’s easy to adapt with herbs and flavors you love. Whether you’re making a quick lunch or need a crowd-pleasing appetizer, this simple recipe is a real winner.