Crusty Cranberry Nut No Knead Bread

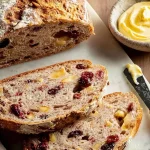
Crusty Cranberry Nut No Knead Bread on a wooden cutting board

Crusty on the outside and soft on the inside, Crusty Cranberry Nut No Knead Bread is everything you could want in a homemade loaf. Studded with sweet dried cranberries and crunchy nuts, this bread is perfect for breakfast, snacks, or as a side to your favorite meal. The beauty of this recipe lies in its simplicity; no kneading is required! Just a bit of planning, and you’ll be rewarded with a delicious, artisan-style loaf that’s impressive yet easy to make.

What Goes into This Crusty Cranberry Nut No Knead Bread

Before you start baking, gather these ingredients:

  • 3 cups + 2 tablespoons (390g) bread flour or all-purpose flour (spooned & leveled)
  • 2 teaspoons coarse sea salt
  • 1/2 teaspoon Platinum Yeast from Red Star instant yeast
  • 3/4 cup (95g) chopped walnuts or pecans
  • 3/4 cup (105g) dried cranberries
  • 1 tablespoon (21g) honey
  • 1 and 1/2 cups (360ml) warm water (about 95°F/35°C)

Step-by-Step Crusty Cranberry Nut No Knead Bread Recipe

  1. Mix the Dry Ingredients: In a large bowl, use a silicone spatula to stir together the flour, salt, instant yeast, chopped nuts, and dried cranberries.

  2. Combine Liquid Ingredients: In a separate bowl, mix the warm water and honey. Then, pour this mixture over the dry ingredients in the large bowl.

  3. Stir It Together: Use your spatula to mix everything until combined. The dough will be very sticky; resist the urge to add more flour. Shape it into a ball as best as you can.

  4. Let It Rise: Cover the bowl tightly and leave it at room temperature for 12–18 hours. You’ll notice the dough will double in size and become bubbly.

  5. Shape the Dough: After resting, turn the dough out onto a lightly floured surface. With floured hands, shape the dough into a ball. It doesn’t need to be perfect!

  6. Prepare for Second Rise: Place the dough on a large piece of parchment paper. Score an “X” on top using a sharp knife. Put the dough in a bowl to rest for 30 minutes.

  7. Preheat the Oven: While the dough rests, preheat your oven to 475°F (246°C). Put your Dutch oven (with the lid) in the oven for 30 minutes to heat up.

  8. Bake the Bread: Carefully place the dough with parchment into the hot Dutch oven, cover with the lid, and bake for 25 minutes. Then, remove the lid and bake for an additional 8–10 minutes until golden brown.

  9. Test for Doneness: Tap the bread lightly; if it sounds hollow, it’s done. For accuracy, the inside should reach 195°F (90°C).

  10. Cool and Serve: Remove the hot pot from the oven, take out the bread, and allow it to cool on a wire rack for at least 20 minutes before slicing.

How to Serve Crusty Cranberry Nut No Knead Bread

This delightful bread is perfect on its own, but you can elevate your serving game! Slice it up and serve with butter or cream cheese for breakfast. It also pairs wonderfully with soups and salads. For a cozy evening, enjoy it alongside a charcuterie board filled with cheeses and fruits.

Expert Tips for Crusty Cranberry Nut No Knead Bread

  • Baking Pot: Use a heavy pot, like a Dutch oven, which helps trap steam and creates a crusty outer layer.
  • Flavor Additions: Feel free to mix in some cinnamon or orange zest for an extra flavor twist!
  • Storage: Keep leftover bread in an airtight container at room temperature for up to one week.

Crusty Cranberry Nut No Knead Bread FAQs

Can I use instant yeast instead of active dry yeast?
Yes! The Platinum Yeast from Red Star instant yeast works wonderfully in this recipe.

How can I tell if my bread is done?
Aside from the sound test, using an instant-read thermometer is a great way to check. It should read around 195°F (90°C) at the center.

Can I add more fruits or nuts?
Absolutely! Feel free to mix in your favorite dried fruits or nuts for personalized flavor.

This Crusty Cranberry Nut No Knead Bread is a fantastic way to bring warmth and comfort to your table. Whether it’s a simple breakfast, an afternoon snack, or a side dish at dinner, it’s sure to please everyone. So roll up your sleeves and give this easy recipe a try! You won’t regret it.

Crusty Cranberry Nut No Knead Bread

This artisan-style bread is crusty on the outside and soft on the inside, studded with sweet dried cranberries and crunchy nuts. Perfect for any meal!
Prep Time15 minutes
Cook Time35 minutes
Total Time13 hours 15 minutes
Course: Breakfast, Side Dish, Snack
Cuisine: American
Keyword: Artisan Bread, Cranberry Bread, Easy Bread Recipe, Homemade Bread, No Knead Bread
Servings: 8 slices
Calories: 180kcal

Ingredients

Dry Ingredients

  • 3 cups 3 cups + 2 tablespoons (390g) bread flour or all-purpose flour (spooned & leveled)
  • 2 teaspoons 2 teaspoons coarse sea salt
  • 0.5 teaspoon 1/2 teaspoon Platinum Yeast from Red Star instant yeast
  • 3/4 cup 3/4 cup (95g) chopped walnuts or pecans
  • 3/4 cup 3/4 cup (105g) dried cranberries

Liquid Ingredients

  • 1 tablespoon 1 tablespoon (21g) honey
  • 1.5 cups 1 and 1/2 cups (360ml) warm water (about 95°F/35°C)

Instructions

Preparation

  • In a large bowl, use a silicone spatula to stir together the flour, salt, instant yeast, chopped nuts, and dried cranberries.
  • In a separate bowl, mix the warm water and honey. Then, pour this mixture over the dry ingredients in the large bowl.
  • Use your spatula to mix everything until combined. The dough will be very sticky; resist the urge to add more flour. Shape it into a ball as best as you can.
  • Cover the bowl tightly and leave it at room temperature for 12–18 hours.
  • After resting, turn the dough out onto a lightly floured surface. With floured hands, shape the dough into a ball. It doesn’t need to be perfect!
  • Place the dough on a large piece of parchment paper. Score an 'X' on top using a sharp knife. Put the dough in a bowl to rest for 30 minutes.
  • While the dough rests, preheat your oven to 475°F (246°C) and put your Dutch oven (with the lid) in the oven for 30 minutes.

Baking

  • Carefully place the dough with parchment into the hot Dutch oven, cover with the lid, and bake for 25 minutes.
  • Then, remove the lid and bake for an additional 8–10 minutes until golden brown.
  • Tap the bread lightly; if it sounds hollow, it’s done. For accuracy, the inside should reach 195°F (90°C).
  • Remove the hot pot from the oven, take out the bread, and allow it to cool on a wire rack for at least 20 minutes before slicing.
Notes

Use a heavy pot like a Dutch oven, which helps trap steam and creates a crusty outer layer. You can add cinnamon or orange zest for extra flavor. Store leftover bread in an airtight container at room temperature for up to one week.

Similar Posts

  • Pistachio Cranberry Wreath Cookies

    Pistachio Cranberry Wreath Cookies are a delightful treat that brings a touch of festivity to any occasion. With their vibrant colors and tempting flavors, these cookies are not only visually appealing but also packed with a delicious blend of crunchy pistachios and tart cranberries. They make the perfect addition to your holiday dessert table or…

  • Delicious No-Bake Vanilla Protein Cheesecake Jars – Quick Treats!

    Why You'll Love This Recipe How to Make No Bake Protein Cheesecake Jars What you will need Step by step Tips and Tricks for the Best No Bake Cheesecake My best tips (so yours turn out right the first time) Cheesecake Topping Ideas Storage Common Questions A sweet little wrap up No-Bake Vanilla Protein Cheesecake…

  • Delicious No-Sugar Chocolate Banana Ice Cream Sandwiches Recipe

    No-Sugar Chocolate Banana Ice Cream Sandwiches are my go to fix when I want something cold and chocolatey but I do not want a sugar crash after. You know that moment when you want dessert, but also want to feel good about it? That is exactly where these little sandwiches live. They are creamy, sweet in a real banana kind of way, and honestly pretty fun to make. I started making them during hot afternoons when my freezer was packed with random bananas I forgot about. Now they are a regular thing around here, especially when I want a treat that still feels like real food.  How to make this vegan chocolate banana ice cream This is the part where you realize you do not need an ice cream machine, fancy ingredients, or a long ingredient list. The base is just frozen bananas plus cocoa powder, and then you can build from there. What you will need If you are in a banana baking mood too, you might also like these super moist chocolate chip banana bread slices for breakfast the next day. I swear bananas are either on the counter for one hour, or they are suddenly brown and begging to be used. Quick directions (my real life method) Drop the frozen banana slices into a food processor or a strong blender. Add cocoa powder, a small splash of plant milk, vanilla if using, and that pinch of salt. Blend, scrape down, blend again. At first it looks crumbly and like it will never turn into anything, but keep going. It turns into a thick soft serve texture, and that is your vegan chocolate banana ice cream. Now for the sandwiches. Scoop the chocolate nice cream onto one cookie, top with another cookie, and gently press. If the nice cream is super soft, you can freeze the assembled sandwiches for 30 to 60 minutes so they firm up and become easier to eat. Sometimes I roll the sides in chopped nuts or cacao nibs if I have them. Sometimes I do nothing and just eat one over the sink. Both options are valid. What makes these ice cream sandwiches healthy? I am not into calling desserts magic health food, but these truly are a better option when you want something sweet without added sugar. The sweetness comes from fruit, and the texture comes from the frozen banana doing its thing. That is why No-Sugar Chocolate Banana Ice Cream Sandwiches feel like a treat, but still sit lightly. Here is what I love about them: For the cookie part, you can keep it simple. If you already have a banana based snack in your rotation, these delicious small batch banana oatmeal cookies no flour no sugar are honestly a great jumping off point. They are naturally sweet, and they freeze well too, which makes them perfect sandwich material. “I made a batch on Sunday and my kids thought it was regular ice cream. The best part is I did not have to argue about dessert turning into a sugar frenzy. We are keeping these in the freezer all summer.” How do you freeze bananas for nice cream? Freezing bananas sounds easy, and it is, but there are a couple little things that make the blending part so much smoother. If you freeze bananas the right way, you will get that thick creamy texture instead of icy chunks that fight your blender. Here is my method: 1) Use ripe bananas. You want the peels to have lots of brown spots. That is where the sweetness is. 2) Slice them before freezing. I do coins, about half an inch thick. Whole frozen bananas are a pain to blend. 3) Freeze on a tray first. Lay slices on parchment so they do not freeze into one giant banana brick. After they are frozen solid, toss them into a freezer bag or container. 4) Label the bag. This sounds extra until you find five mystery freezer bags later. If you are like me and end up with extra bananas every week, you might also enjoy baking them into banana chocolate chip mini muffins. I make those when I want something grab and go, and I freeze a few for later just like I do with banana slices. One more thing. If your blender is struggling, let the banana slices sit on the counter for 3 to 5 minutes. Not long enough to melt, just enough to take the icy edge off. What is Nice Cream? Nice cream is basically the internet nickname for blended frozen bananas that turn into an ice cream like texture. The banana acts like the creamy base, so you do not need heavy cream, condensed milk, or added sugar to make it satisfying. The flavor is super customizable. You can turn it into chocolate, peanut butter, strawberry, coffee, or even a cinnamon vibe. For this recipe we are going all in on chocolate banana, which is why these No-Sugar Chocolate Banana Ice Cream Sandwiches taste like a real dessert even though the base is fruit. Nice cream is best right after blending if you like soft serve. If you want scoopable and firm, freeze it for 1 to 2 hours in a container. Just know that it freezes harder than regular ice cream, so you may need to let it sit out a few minutes before scooping. Also, if you love no sugar added chocolate desserts, I have to point you to this cozy one: indulgent small batch coconut milk chocolate pudding no sugar added. It hits that same chocolate craving in a different way. A few tips for the perfect chocolate banana ice cream every time I have made this enough times to know where things can go weird. Here are the tips that keep it smooth, chocolatey, and sandwich worthy. Do not add too much plant milk at the start. Start with one tablespoon, then add more only if your machine needs help. Too much liquid makes it more like a smoothie, and then it leaks out of the cookies. Use good cocoa powder. You do not need fancy, but use one you actually like the taste of. If it tastes bitter in your pantry, it will taste bitter in your nice cream. Salt matters. A tiny pinch makes the chocolate taste deeper. Not salty, just better. Freeze the sandwiches after assembling. If you want that classic ice cream sandwich bite, freeze them on a tray first, then wrap individually. They keep well for about 2 weeks, though in my house they disappear faster. Cookie options that work. You want something that is sturdy enough to hold up, but not so hard that it is tough to bite when frozen. If you need another chocolate snack idea, these chocolate almond bites can be a fun side treat with your coffee while the sandwiches chill. Make them mini. This is my sneaky trick for portioning without feeling restricted. Mini No-Sugar Chocolate Banana Ice Cream Sandwiches are also easier for kids, and they freeze faster. Common Questions 1) Do these taste like bananas?  Yes, but in a good way. Chocolate covers a lot of it, and using ripe bananas makes it taste more like natural sweetness than banana flavoring. 2) Can I make these without a food processor?  A high powered blender works, but you will need to stop and scrape more often. If it is a small blender, blend in batches and use a little plant milk to help it move. 3) How long do they last in the freezer?  About 2 weeks for best texture. Wrap them individually so they do not pick up freezer smells. 4) Why did my nice cream turn icy?  Usually it is too much liquid, or the bananas were not ripe enough. Ripe bananas and minimal milk make it creamy. 5) Can I add peanut butter or protein powder?  Peanut butter is amazing, start with one tablespoon. Protein powder can work, but it can make the texture thicker and a bit chalky depending on the brand, so add slowly. Freezer friendly dessert that actually hits the spot If you try these No-Sugar Chocolate Banana Ice Cream Sandwiches, you will see why I keep bananas in my freezer like it is my job. They are simple, flexible, and they satisfy that chocolate craving without needing added sugar. Keep a batch stashed for late night cravings, hot afternoons, or the moment you want dessert but still want to feel good after. If you want another similar idea, this linked recipe for Healthy 4-Ingredient Chocolate Banana Ice Cream is also a great reference for extra variations. Now go rescue those ripe bananas on your counter and make yourself a couple sandwiches for later.  These No-Sugar Chocolate Banana Ice Cream…

  • Nanaimo Bars

    Nanaimo Bars are a delightful no-bake dessert that hails from Canada, specifically from Nanaimo, British Columbia. These bars are a trifecta of flavor and texture, with a crumbly base, a creamy middle layer, and a rich chocolate top. Each bite is a sweet moment of bliss, making them perfect for sharing at gatherings, or simply…

  • Delicious No-Bake Peanut Butter Protein Balls (3 Ingredients)

    Ingredients and Substitutions How to Make No-Bake Peanut Butter Balls Quick step by step Additions & Substitutions Easy add ins that actually work Expert Tips Getting the texture just right Storing Peanut Butter Balls Common Questions Can I make No-Bake Peanut Butter Protein Balls (3 Ingredients) without honey? My mixture is too dry. What should…

Leave a Reply

Your email address will not be published. Required fields are marked *

Recipe Rating